follow me

NetScreen5XTファームアップ

NetScreen 5XTのファームウェアアップデートしました。
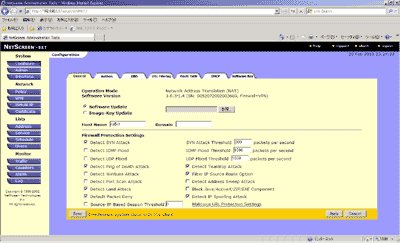
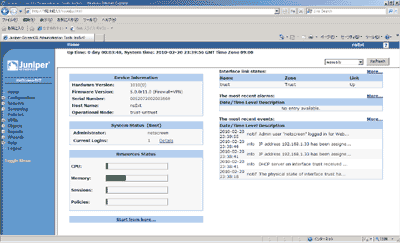
3.0.3r1.4という骨董品状態から、5.0.0r11に上げました。
インターフェイスがガラッと変わってしまいました。。。

3.0.3r1.4

5.0.0r11


ブラウザで、サクッとできてしまうのは良くできてるというか、Firewall製品としてどこの会社でも見るぐらい良く使われてる訳ですね。
ちなみに、アップデート時にシリアルコンソール側はこんな感じになってました。
初期ユーザとパスワードは、毎度の如くnetscreen/netscreenですね。
ns5xt-> trust interface change state to Up
Save System Configuration  ... Done
 update new flash image (02d6c790,3467367)
platform = 17, cpu = 10, version = 16
offset = 20, address = 1a00000, size = 3467289
date = 33650050, time = 28008000, cksum = 4a788bab
Program flash (0,3467367) ...
++++++++++++++++++++++++++++++++++++++++++++++++++++done


NetScreen NS-5XT/5XE Boot Loader Version 1.2.0 (Checksum: 8DCDA266)
Copyright (c) 1997-2002 NetScreen Technologies, Inc.

Total physical memory: 64MB
    Test - Pass
    Initialization - Done

Model Number: NS-5XT

Hit any key to run loader

Load image from on-board flash...

Ignore image authentication!

Start loading...
................................................
Done.


Juniper Networks, Inc
NS-5XT  System Software
Copyright, 1997-2004

Version 5.0.0r11.0
Load Manufacture Information ... init manufacture info Done
Load NVRAM Information ... (3.3)Done
Install module init vectors
Verify ACL register default value (at hw reset) ... Done
Verify ACL register read/write ... Done
Verify ACL rule read/write ... Done
Verify ACL rule search ... Done
MD5("a") = 0cc175b9 c0f1b6a8 31c399e2 69772661
MD5("abc") = 90015098 3cd24fb0 d6963f7d 28e17f72
MD5("message digest") = f96b697d 7cb7938d 525a2f31 aaf161d0
Verify DES register read/write ... Done

Upgrading the loader. DO NOT power off the NetScreen device during this operation. Powering off the device during the loader upgrade could result in permanent damage to the device.
....The upgrade of the loader is complete.

Upgrading the file system. DO NOT power off the NetScreen device during this operation. Powering off the device during the file system upgrade could result in loss of data.

Moving files from one file system to the other file system.
......
All files were successfully moved from one file system to the other.

The upgrade of the file system is complete.

No work mode initialized, set to  mode

Initial port mode trust-untrust(1)
Install modules (00723c60,00c0ddd4) ... load dns table . Done

Initializing DI 1.1.0-ns
System config (2229 bytes) loaded
Load System Configuration ............
Unsupported command - set interface untrust dhcp
...................
Unsupported command - set flow check-session
...................
Unsupported command - set dial-up speed 9600
.................Done
system init done..
login: trust interface change state to Up
System change state to Active(1)
follow me

FONERA 2.0n

11n対応のFonルータが登場しましたよと。
FONERA 2.0n登場です。USBも付いてます。
もちろん、Amazon.co.jpで買えます。

で、値段なんですが、¥7,480。。。
FONERA 2.0は、¥6,980。。。
FONERA 2.0を買ってしまってた僕負け組ですか?

で届きました。
Amazonやっぱり箱でかいw


本体思った以上にオモチャみたいにショボイ。。。


で、裏にあるスイッチ。
Wireless ON/OFF。。。???Fonなのに?OFF?
follow me

Upside-Down-Ternet

串で遊んでみる。
無線LANをただのりする人をこらしめる「Upside-Down-Ternet」です。

SquidとhttpdとImageMagickとiptableで、httpのパケットをすべてリダイレクトさせて気がつかないうちに、画像を上下反転させたりしてみます。
画像をグレースケールにしてみたり、イロイロ愉しめます。


設定詳細は本家ページで見て頂くとして。
まずは、squidの設定は基本的な設定をした後、以下でスクリプトを経由する様に設定追加。
redirect_program /usr/lib/squid/redirect.pl
スクリプト内容はこんな感じ。
#!/usr/bin/perl
$|=1;
$count = 0;
$pid = $$;
while (<>) {
        chomp $_;
        if ($_ =~ /(.*.jpg)/i) {
                $url = $1;
                system("/usr/bin/wget", "-q", "-O","/var/www/images/$pid-$count.jpg", "$url");
                system("/usr/bin/mogrify", "-flip","/var/www/images/$pid-$count.jpg");
                print "http://<串のIP>/images/$pid-$count.jpgn";
        }
        elsif ($_ =~ /(.*.gif)/i) {
                $url = $1;
                system("/usr/bin/wget", "-q", "-O","/var/www/images/$pid-$count.gif", "$url");
                system("/usr/bin/mogrify", "-flip","/var/www/images/$pid-$count.gif");
                print "http://<串のIP>/images/$pid-$count.gifn";

        }
        else {
                print "$_n";;
        }
        $count++;
}
変換したimagesをhttpdで公開する様にして、その画像をクライアントに返します。
※httpdとsquidの実行ユーザは同じにするか、グループを同じにしてください。(画像が読み込めません。。。)
あと、画像が溜まって行くので、定期的に削除する様にcronにでも登録してください。
follow me

LaFonera(Fon) SSH有効化

オフライン状態になっていたFon復活させました。
普段使っている無線ルータのMIMOが11nとして認識できないので、ルータ側の無線は停止してしまおうかと。。。

でせっかくなので、SSH有効化して拡張ファームに変更を。
いつの間にやらファームウェアが、firmware 0.7.1 r3になってました。
はじめに、ファームウェアを0.7.1 r1に戻します。

1.LANケーブルを外し、リセットボタンを30秒以上長押しした後、電源再起動。
2.インターネットに接続できない状態で、169.254.255.1にアクセスしファームのバージョンが戻っている事を確認。
※ネットに繋がると、ファームのバージョンがアップされてしまうので、インターネットには絶対つながない。

3.次のHTMLファイルをfirst.htmlというファイル名で作成。
<html><head></head><body><center>
<form method="post" action="http://169.254.255.1/cgi-bin/webif/connection.sh" enctype="multipart/form-data">
<input name="username" value="$(/usr/sbin/iptables -I INPUT 1 -p tcp --dport 22 -j ACCEPT)" size="68" />
<input type="submit" name="submit" value="Submit" />
</form></center></body></html>

4.次のHTMLファイルをsecond.htmlというファイル名で作成。
<html><head></head><body><center>
<form method="post" action="http://169.254.255.1/cgi-bin/webif/connection.sh" enctype="multipart/form-data">
<input name="username" value="$(/etc/init.d/dropbear)" size="68" ><input type="submit" name="submit" value="Submit" />
</form></center></body></html>
5.ブラウザでfirst.htmlを開いてSubmitをクリックします。デフォルトのユーザ名とパスワードはadmin/admin。
6.second.htmlも同様に実行。
7.SSHで接続し、rootでログイン。パスワードはadmin。
8.以下を実行。
mv /etc/init.d/dropbear /etc/init.d/S50dropbear
9./etc/firewall.userの以下をコメントアウト。
iptables -t nat -A prerouting_rule -i $WAN -p tcp --dport 22 -j ACCEPT
iptables -A input_rule -i $WAN -p tcp --dport 22 -j ACCEPT
10.自動でアップデートされない様に細工。
/bin/thinclientの以下箇所をコメント化。
. /tmp/.thinclient.sh
かわりに以下を追加。
cp /tmp/.thinclient.sh /tmp/thinclient-$(date '+%Y%m%d-%H%M')
こっちでもいいらしぃ。ファイルが増えないからコッチがいいかも。
if [ `cat /tmp/.thinclient.sh | wc -c` -le 33 ]; then
rm /tmp/.thinclient.sh
else
cp /tmp/.thinclient.sh /tmp/thinclient-$(date '+%Y%m%d-%H%M')
fi


でSSH有効化完了。
BusyBox v1.1.3 (2006.11.21-19:49+0000) Built-in shell (ash)
Enter 'help' for a list of built-in commands.

 _______  _______  _______
|   ____||       ||   _   |
|   ____||   -   ||  | |  |
|   |    |_______||__| |__|
|___|

 Fonera Firmware (Version 0.7.1 rev 1) -------------
  *
  * Based on OpenWrt - http://openwrt.org
  * Powered by FON - http://www.fon.com
 ---------------------------------------------------
root@OpenWrt:~#
follow me

La Fonera 2.0届いた

La Fonera 2.0買いました。5,980円。
USB搭載で、Torrentダウンロードなども出来るオモチャ。
ストレージになるのは便利ですね。
ルータとしてではなく、簡易ファイルサーバ兼ダウンロード機には便利。
Amazonならすぐ届きますしw


follow me

La Fonera 2.0

La Fonera 2.0が日本でも販売するそうな。
今回は、USB搭載でHDDをつないでネットワークストレージとして利用可能です。
PC間でちょっとデータを移動したい時に便利かもしれません。
プラグインで機能追加が可能なので、iTunes鯖なんてことも可能かもw

価格は、6,980円と少し高くなってしまいましたが、十分遊べるオモチャではないでしょうか。
25日よりAmazon.co.jpを通じて販売予定(大手量販店でも取扱の予定)との事。

6月25日~7月9日の期間中は特別価格5,980円。
また、同期間中は「La Fonera+」を2,980円、「La Fontenna」を980円で販売するとの事なので、なんとしてでもこの期間に入手しなくては!
follow me

Networkの勉強は仮想マシンで

Ciscoルータの勉強用には、Dynamips
Cisco PIXの勉強用には、PEMU
Juniperの勉強用には、Olive(JEMU)
なにやら、Cisco IDS/IPSをVMwareで動かす方法もあるらしいです。

本物のIOSを使用したりするので、実機を持っていないとライセンス問題がありますが、中古の爆音ルーターで勉強するより良いですよ。
とあるサーバルームでは、中古のルーターは部屋の隅で眠っていて、吸い出したIOSでDynamipsを起動しています。

昔に比べれば、勉強しやすい環境になってきてるんですかね~。
follow me

Fon (Linusになりました)

悩みながら、Linusになりました。(登録の仕方ぐらいマニュアル読めよ。。。
これで、私も本当のFonユーザー。

MyPlaceから入って、Fonルータを登録するのが手順らしい。
個人情報書き換えて、表示をTochiroに変えるのに、また一苦労。
結局、地図の位置まったく合わないし。。。

とりあえずは、登録できた訳だしOKとしよう。
アンテナ買えば200mは飛ぶらしいので、それも面白ろそうですね~。

この画面出すのにひたすらイロイロと操作をウリウリと。。。


follow me

Fon (La Fonera)

かんなり前に、500円で購入したLa Foneraをひっぱりだしました。
私もLinusになります。

でFoneraには2パターンありまして、他のFoneraと無料で帯域をシェアしあう「Linus」、自分の帯域を有料で提供する「Bill」なんですが。
名前の由来がLinuxカーネルとWindowsという2つのOSの設計者のファーストネームらしく。
気に入りました。

まぁ、FirmwareをOpenWrtに書き換えるまでの間ですが。。。
Fonの機能は無くしたくないし、FreeWLANぐらいの方がいいのかな?

follow me

dynamips-0.2.7 for CentOS5

dynamips(Cisco 7200 Simulater)のCentOS5用RPM用意しました。
ついでに、dynagenも。
dynamips起動して、dynagenでconfig喰わせて、telnetでCisco Simulaterに接続がやりやすいっぽいです。
使い方もろもろは次回。

dynamips-0.2.7-1.i386.rpm
dynamips-0.2.7-1.i686.rpm
dynamips-0.2.7-1.athlon.rpm
dynagen-0.9.3-1.noarch.rpm